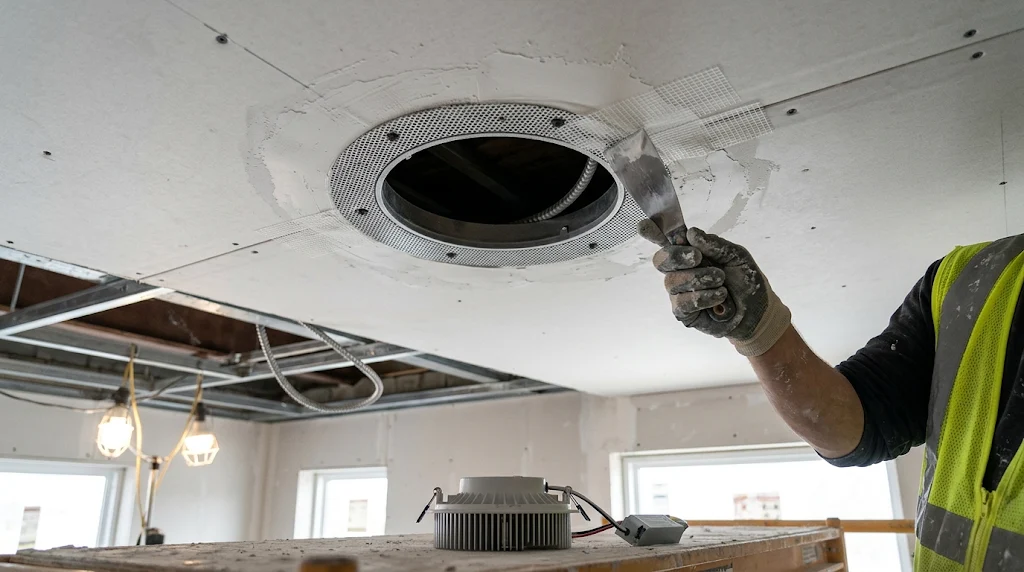
Trimless (plaster-in) downlights and linear profiles set the benchmark for high-end minimalist ceilings. Integrated into the plasterboard, they create the continuous, clean ceiling plane that makes this detail so distinctive.
On site, the result depends on coordination between the lighting specification, ceiling build-up and finishing trades. If the fitting or available void is checked too late, installers may face cracks around the fitting after handover or find that the luminaire does not fit the shallow ceiling void common in renovations.
This guide explains the article’s approach to the plaster joint, the effect of ceiling clearance on heatsink selection, and the frame-to-board installation sequence.
1. Preventing Plaster Cracks: The Pre-Installation Frame
The most common failure in trimless lighting is hairline cracking in the plaster around the fixture. This occurs due to the different thermal expansion coefficients of the ceiling material (gypsum board) and the luminaire's mounting frame, as well as structural vibrations in the building.
To mitigate this, the choice of the pre-installation frame is critical.
Many budget fixtures use thin, stamped sheet metal frames. These frames are flexible and prone to warping when screwed into the drywall, creating uneven stress points. When the ceiling expands or contracts, the weak frame shifts, cracking the skim coat.
For reliable installations, high-quality trimless downlights utilize rigid die-cast aluminum frames. Die-cast aluminum resists warping during installation and provides a stable, unyielding base for the plaster. Furthermore, these frames must feature a perforated flange (mesh edge). The perforations allow the drywall joint compound (plaster) to push through and lock the frame mechanically to the ceiling board, creating a unified surface that resists cracking.
2. Ceiling Clearance: Working with a Shallow Void
Modern architectural designs often maximize room height by minimizing the ceiling void (the space between the drywall and the concrete slab or joists). Electrical contractors frequently encounter ceiling voids as shallow as 85mm to 100mm, which is insufficient for traditional, tall die-cast heatsinks.
If a standard downlight is forced into a tight space, the heatsink may press against insulation or concrete, severely compromising airflow and leading to premature LED thermal failure.
To solve this, low-profile optical engines are required. Instead of traditional extruded or tall die-cast heatsinks, engineered solutions utilize cold-forged aluminum heatsinks. Cold forging creates highly dense aluminum with thinner, more numerous cooling fins. This maximizes the surface area for thermal dissipation while keeping the overall fixture height incredibly shallow (often under 65mm).
This allows contractors to install high-wattage trimless downlights in restricted ceiling clearances without risking thermal degradation.
3. Installation Sequence: The Drywall Interface
Even with the best hardware, incorrect installation will lead to failure. Proper coordination between the electrician and the drywaller is essential.
A standard installation sequence for a flawless trimless finish involves:
- Step 1: Secure Mounting: The die-cast frame is screwed directly into the gypsum board. It is crucial to use a sufficient number of drywall screws to prevent any movement.
- Step 2: Fiberglass Mesh Tape: Applying fiberglass mesh tape over the perforated flange of the frame before plastering adds immense tensile strength to the joint, drastically reducing the risk of hairline cracks.
- Step 3: Skimming and Sanding: The drywaller applies joint compound over the mesh, feathering it out seamlessly into the surrounding ceiling. Once sanded and painted, the optical engine is simply pushed into the frame using a snap-in or twist-lock mechanism.
| Specification | Budget/Standard Approach | Engineered Trimless Solution |
|---|---|---|
| Mounting Frame | Stamped sheet metal (prone to warping and cracking). | Rigid die-cast aluminum with perforated flanges for plaster locking. |
| Heatsink & Clearance | Tall extruded/die-cast aluminum (requires >120mm void). | Low-profile cold-forged aluminum (fits in <85mm shallow voids). |
| Installation Joint | Direct plastering over metal flange. | Integration of fiberglass mesh tape over the flange before skimming. |
Specifying Trimless Lighting for Your Project
Successfully executing a trimless lighting design requires more than just aesthetics; it demands robust structural engineering and contractor-friendly installation mechanisms.
At Fanxing Lighting, our trimless downlights and linear profiles are designed with heavy-duty die-cast plaster-in frames and low-profile cold-forged thermal management, ensuring long-lasting, crack-free ceilings for commercial and residential projects.
If you are an architect, lighting designer, or electrical contractor facing clearance challenges, contact our engineering team to review CAD details or request installation samples.